 |
 |
|||||||||||||||
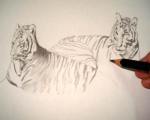
"Is A Tiger Pencil Drawing
|
||||||||||||||||
 |
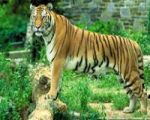
Tigers (Panthera tigris) are mammals of the Felidae family and one of four "big cats" in the Panthera genus. They are apex predators and the largest feline species in the world, comparable in size to the biggest fossil felids.
The Bengal Tiger is the most common subspecies of tiger, constituting approximately 80% of the entire tiger population, and is found in India, Bangladesh, Bhutan, Myanmar, and Nepal. An endangered species, the majority of the world's tigers now live in captivity.
What a pity...
| |
 |
Anyway, let's start your step by step drawing of your tiger pencil drawing...
![]()
Step No. 1
Relax... Take a deep breath... Clear your mind... Take a piece of paper (preferably a cheap photocopy paper) and a drawing pencil set. (Do you know what is a drawing pencil set? Click here)
Select a nice place to sit. Make a cup of coffee or hot chocolate if you want.
![]()
Step No. 2
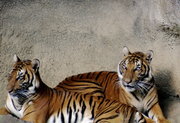
Select your still life tiger picture to have your tiger pencil drawing.
With that you can start a still life sketches of tiger drawings and
produce your own tiger pencil drawing. Got one? Let's go to the next
step...
![]()
Step No. 3
  |
Then, you can follow this simple step by step drawing lesson to have your own tiger pencil drawing...
![]()
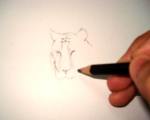
Step No. 4
Take a HB or B grade graphite pencil. Use it to draw sketches. Start by sketching the head part only.
Here's the magic part... Look at your still life tiger picture subject
and start from the center. Draw a part of the eye first without looking
at the paper! Then, stop looking at your subject and compare it with
your sketch.
Ask these 2 important questions:-
1. Does it has a correct size to be on your paper?
2. Does it has a correct angle based on your position?
If the answer is NOT to any of these questions...Erase it, and re-sketch your drawing according to the correct size and angle.
Once you get that, then you can continue your next bit of sketching...
 |
Repeat the same process until you complete a whole one part of your pencil still life sketch. For example, you can consider a pair of eyes is a whole one part of a face in your tiger pencil drawing.
Get it? Great... Let's continue...
![]()
Step No. 5
 |
Now put down your HB or B grade graphite pencil and take out your 2B
and 4B grade pencils. Start to create tones in your tiger pencil sketch
drawings. Make your tiger pencil drawing alive!
Take note that you are drawing in a black and white pencil sketch. There will be no other color... yet you are drawing a 3D subject! So, you have to differentiate the tones to represent a 3D perspective.
You can start with any of the two pencils. I suggest you use a 2B pencil first to create fine stroke from the center to the outer part of your tiger pencil drawing. Follow the contour curves of the surface to produce a depth effect.
Then, use a 4B pencil for darker tones especially the 'deeper' part (in a 3D perspective) of your subject.
Fine...
The next step...
![]()
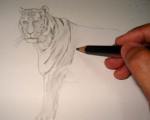
Step No. 6
 Sketch the other part of your tiger still life drawing subject. Repeat Step No. 1 to Step No. 5.
![]()
And finally...
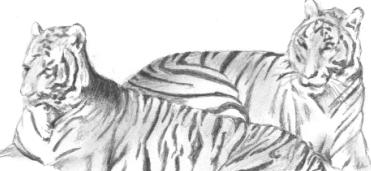 |
Like it?
Keep it in a folder or paste it on your room's wall. I highly recommend that you scan your artwork or at least take a few snaps using a digital camera and then store your images at any available free image hosting company like Photobucket. Just hit the image below!

Or, you can have your own personalized t-shirts from this tiger drawing. Visit Custom T-Shirts to have yours... There is no minimum order required. Just hit on the image below

Get it? Or have any questions or comments on how to draw realistic tiger drawings in pencil? Click here to ask or comment on tiger drawings.
Want some more?Subscribe to my newsletter. This is a monthly newsletter for you to find out what are the latest announcements or offerings that can help you in relation to these topics.
| ||||||
Otherwise, you can subscribe to my Drawing blog (no e-mail necessary), right-click on the orange RSS button (see buttons below the navbar),
If your not sure what to do, Click here and follow simple instructions Or click on the My Yahoo! button or My MSN or Add To Google button if you keep a personalized home page there. Once you start, you will be amazed at what RSS can do.
Return from Tiger Pencil Drawing to other Animal Pencil Sketches
Return to Pencil Drawings Home
Follow Us
![]()
![]()
![]()
What Pencil Drawing Topics Are You Looking For Today?
Best Deals

Learn how to sketch the fun way!
Let's Share & Comment!
Your Drawing Space


Then why not use the button below, to add us to your favorite bookmarking service?

Return to top
Copyright© Pencil Drawings 2007-2012.
Get High Ranking On Major Search Engines